My Canoe Journeys
I got a canoe through craigslist.org. I had an ipod from my days in Japan and didn't use it anymore, so I offered a fair trade for a canoe. I listed the ad searching for a fixer upper, preferably with no holes.
I got quite a few responses, even with the economy the way it is these days, and many people were trying to offload JUNK on me. What I was looking for was simple:
A strong canoe hull, fiberglass, with no holes or serious cracks. I didn't care about the seats, so much, because I wanted to do it and 'fix it up' myself. Well, I got exactly what I wanted!
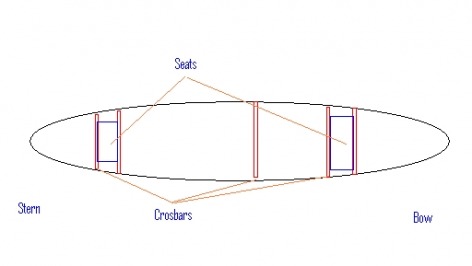
I got a canoe with a fiberglass hull, and aluminum crosbars to support the seats and one crosbar in the middle. both the seats were broken and the rivets holding the crosbars to the fiberglass hull were cracked. Not a problem, I thought. I think a bit differently now, but heres a drawing of what it was:
I got quite a few responses, even with the economy the way it is these days, and many people were trying to offload JUNK on me. What I was looking for was simple:
A strong canoe hull, fiberglass, with no holes or serious cracks. I didn't care about the seats, so much, because I wanted to do it and 'fix it up' myself. Well, I got exactly what I wanted!
I got a canoe with a fiberglass hull, and aluminum crosbars to support the seats and one crosbar in the middle. both the seats were broken and the rivets holding the crosbars to the fiberglass hull were cracked. Not a problem, I thought. I think a bit differently now, but heres a drawing of what it was:
The first step: getting it ready for all the other steps...
After getting the canoe from the guy on craigslist and taking it home, I had a bbq to celebrate!
It wasn't even close to being ready to take out, but, you know I had to celebrate. After that, I started to get down to work. The first thing I did was take off the pieces that I didn't want or wanted to replace. These were the aluminum endcap pieces that went over the ends to keep out moisture, etc, and also the rivets and aluminum crosbars that held the seats up.
So, I took a paint scraper, claw hammer and small flat head screw driver. First thing I did was punch out all of the rivets holding down the endcaps and the pieces that attached to the hull and crosbars. Then I took the paint scraper to pull them off, worked like a charm.
The next thing I had to do was the hardest: sanding and grinding. I started off doing the bottom, I wanted to sand down the chipped paint/fiberglass and prepare it for some light fiberglass reinforcement on the keel and bow.
I used a power sander on very low and 60 grit sandpaper for this. It took me a very long time to get the finish I wanted and an even longer time to grind/sand the inside where I wanted to glue and fiberglass the wood pieces for the seats and center.
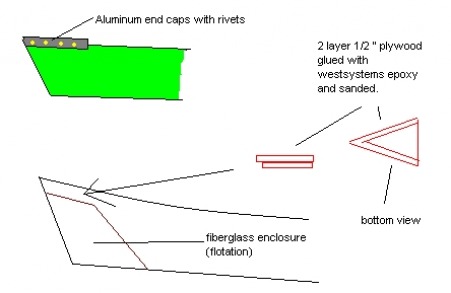
This is what I wanted to turn it into: a 2 seat fixed canoe with a fish box and table in the center, kind of like this:
It wasn't even close to being ready to take out, but, you know I had to celebrate. After that, I started to get down to work. The first thing I did was take off the pieces that I didn't want or wanted to replace. These were the aluminum endcap pieces that went over the ends to keep out moisture, etc, and also the rivets and aluminum crosbars that held the seats up.
So, I took a paint scraper, claw hammer and small flat head screw driver. First thing I did was punch out all of the rivets holding down the endcaps and the pieces that attached to the hull and crosbars. Then I took the paint scraper to pull them off, worked like a charm.
The next thing I had to do was the hardest: sanding and grinding. I started off doing the bottom, I wanted to sand down the chipped paint/fiberglass and prepare it for some light fiberglass reinforcement on the keel and bow.
I used a power sander on very low and 60 grit sandpaper for this. It took me a very long time to get the finish I wanted and an even longer time to grind/sand the inside where I wanted to glue and fiberglass the wood pieces for the seats and center.
This is what I wanted to turn it into: a 2 seat fixed canoe with a fish box and table in the center, kind of like this:

Forming the new end pieces
After the sanding, I flipped it over to sit on its bottom (I made a little cradle for it to sit on the grass very nicely!). I started working on the end pieces or endcaps as I call them. I started with 2 trimmed pieces of marine-grade plywood to cover from the tip of the canoe to about 10 1/2 inches onto the boat. I wanted to get rid of the aluminum because it was nasty, scratched and dented, and to be honest, I like working with wood and fiberglass. So, I trimmed to pieces to fit on top of one another, and the top piece a bit larger to fit on top of the fiberglass rim at the top. The bottom piece, I hoped, would fit snugly inside the fiberglass rim:
Installing the end pieces to fit perfectly... I hope
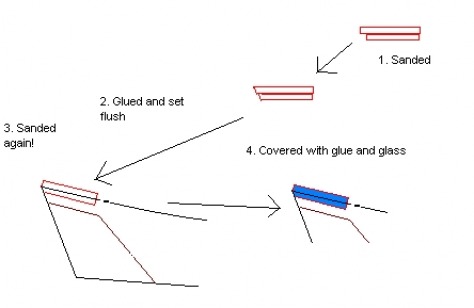
So After trimming the pieces and trying to fit in the right way, I grinded down the inside rim of the fiberglass til I had a snug fit. It wasn't perfect of course, but that's why there's resin and filler! I then sanded the pieces perfectly and glued them together using the epoxy (west systems) and also coated both sides of them to protect against water damage. I set some waxpaper (BIG MISTAKE) and put a weight on it to let it cure. After it dried, I realized I messed up BIG TIME with the waxpaper: you can only take it off with a sander. Goodness gracious... Anyway, I DID manage to get it off and set into the end, then I did the bow, it looked something like this:

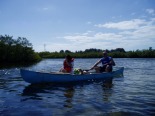
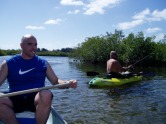
When I got it, I had to try it out!
Explore
Small Boat Repair Links
Totally free boat plans
Boatbuilding
JEM Watercraft
Glen Designs
Free Design Resources
More Free Boat Plans
Vintage Boat Plans
Fiberglass Repair supplies
Boatbuilding
JEM Watercraft
Glen Designs
Free Design Resources
More Free Boat Plans
Vintage Boat Plans
Fiberglass Repair supplies
Some other great links!
Great work at home info blog
Late Night Political Jokes
The Small Print
Slate
Japanzine
Free Online Classes
Steve Pavlina
Late Night Political Jokes
The Small Print
Slate
Japanzine
Free Online Classes
Steve Pavlina

